How To Create Datasource In Websphere
How to use the Teradata JDBC Driver with WebSphere 7.0
- Connection Pool via Administrative Console
- Start the Administrative Console
- Add the Teradata JDBC Driver
- Configure the Driver
- Create the Data Source
- Configure the Data Source
- Set Data Source Custom Properties
- Accessing the DataSource via a Java Servlet
- DataSource.getConnection() vs. DataSource.getConnection(username,password)
- Using the DataSource
- Accessing the DataSource with WebSphere Java 2 Security Enforced
- Performance Parameters
Connection Pool via Administrative Console
A Connection Pool is created via the graphical interface of the administrative server.
Start the Administrative Console
Use the Desktop "Start" button as follows:
Start → Programs → IBM WebSphere → Application Server v7.0 → Profiles → AppSrv01 → Administrative console
Add the Teradata JDBC Driver
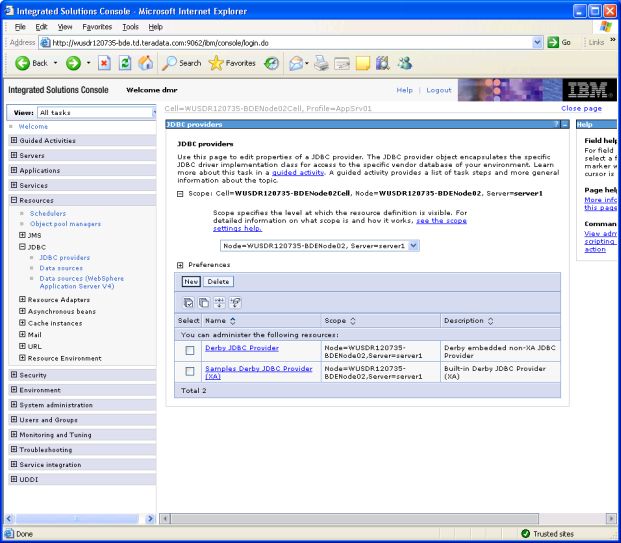
Under "Resources", click "JDBC" and then "JDBC Providers" in the left pane.
Select appropriate scope for the JDBC provider in the right pane.
Press "New" in the right pane.
The following are the four configuration steps for creating a new JDBC provider:
- Create new JDBC provider
- Enter database class path information
- Summary
The next section discusses these configuration steps and the required configuration information.
Configure the Driver
Now the Driver must be configured as shown below.
The following screen shot illustrates the first step: Create new JDBC provider
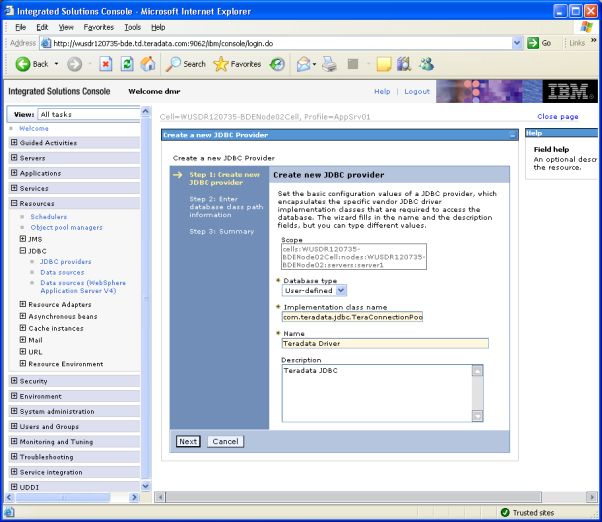
The required configuration information is listed in the following table.
Field | Value | Example |
Database type | The database type being used. | User-defined |
Implementation Classname | The name of the Teradata JDBC Driver data source class. | com.teradata.jdbc.TeraConnectionPoolDataSource |
Name | The name of the driver. This is user-defined. | Teradata Driver |
Description | User-defined. | Teradata JDBC |
Press "Next" to move to the second step.
The following screen shot illustrates the second step: Enter database class path information
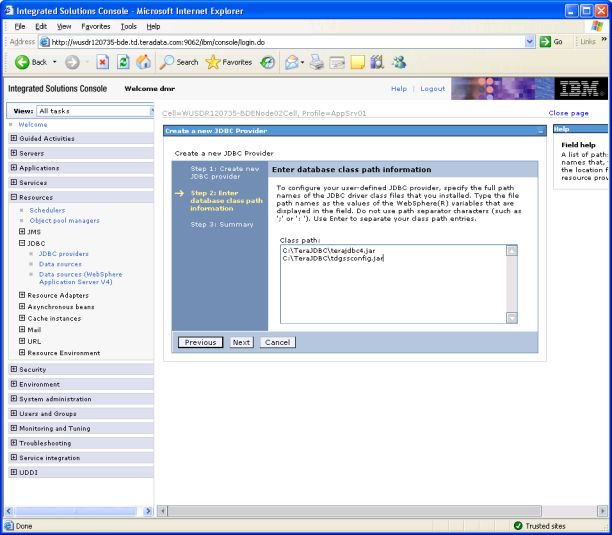
The required configuration information is listed in the following table.
Field | Value | Example |
Class path | The full path name of the jar file(s) that make up the Teradata JDBC Driver. The example assumes that you have copied these file(s) to the C:\TeraJDBC directory on your system. A path on a Unix machine would use forward slashes to separate its components. Beginning with Teradata JDBC Driver 16.20.00.11, | C:\TeraJDBC\terajdbc4.jar |
Press "Next" to move to the third step.
The following screen shot illustrates the third step: Summary
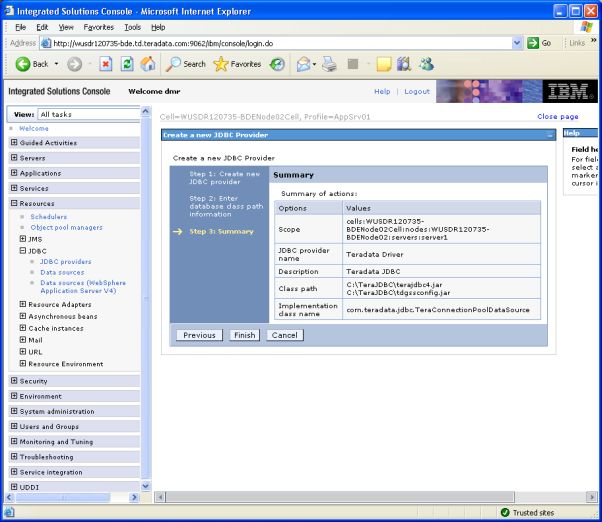
Press "Finish" to submit the changes.
Note that "Teradata Driver" will now appear in the list of JDBC Providers. Click "Teradata Driver", the following screen shot shows the newly created JDBC provider information.
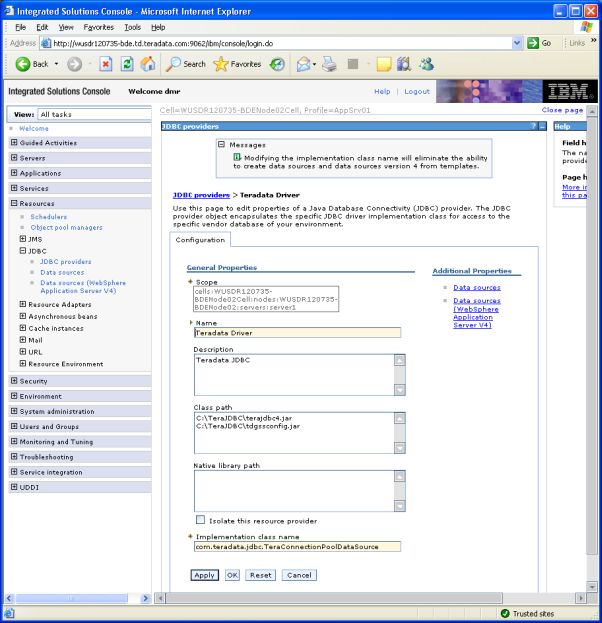
To create a data source, click "Data Sources" on the right side in the pane.
Create the Data Source
The following figure shows how to create a Data Source.
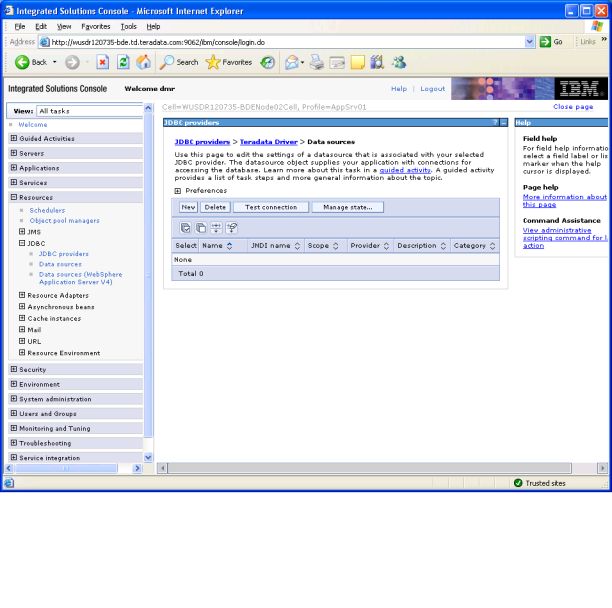
Click "New" in the "Data Sources" pane.
The following are the four configuration steps for creating a data source:
- Enter basic data source information
- Enter database specific properties for data source
- Enter security aliases
- Summary
The next section discusses these configuration steps and the required configuration information.
Note: A version 4.x Data Source can also be configured. The required fields are a subset of version 5.x and so are not listed here. The "Database name", "Default User Id" and "Default User password" of a version 4.x data source will override any values defined as custom properties.
Configure the Data Source
Configure the Data Source by entering the data as shown below.
The following screen shot illustrates the first step: Enter basic data source information
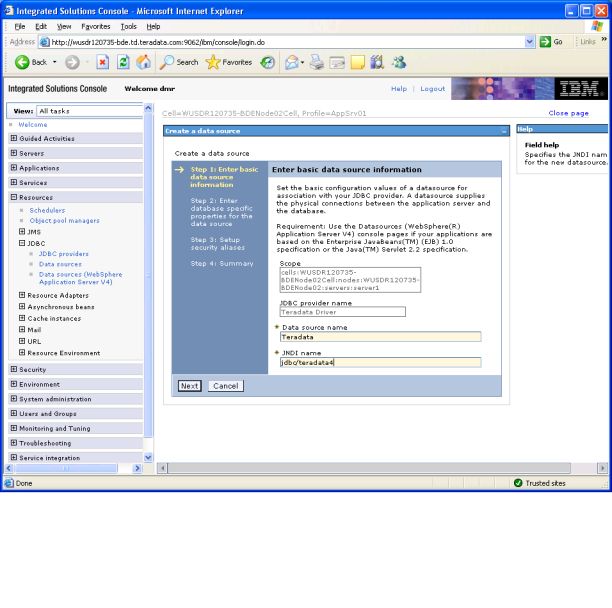
The required configuration information is listed in the following table.
Field | Value | Example |
Data source name | The user-defined display name for this resource. | Teradata |
JNDI Name | User-defined JNDI name of the DataSource. | jdbc/teradata4 |
Press "Next" to move to the second step.
The following screen shot illustrates the second step: Enter database specific properties for data source
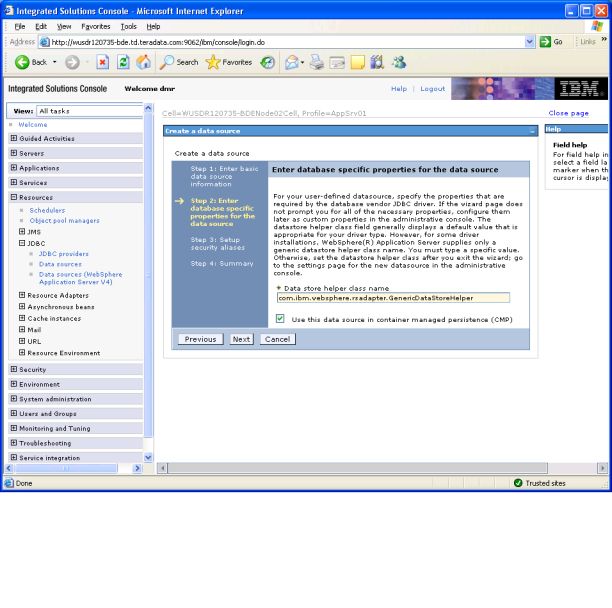
The required configuration information is listed in the following table.
Field | Value | Example |
Data store helper class name | Data store helper classes provided by WebSphere | Select the default value "com.ibm.websphere.rsadapter.GenericDataStoreHelper". |
Container Managed Persistence | Set if Data Source will be used for CMP of EJBs. | Check this box if the Data Source will be used with CMP entity beans. Otherwise, leave it unchecked. |
Press "Next" to move to the third step.
The following screen shot illustrates the third step: Setup security aliases
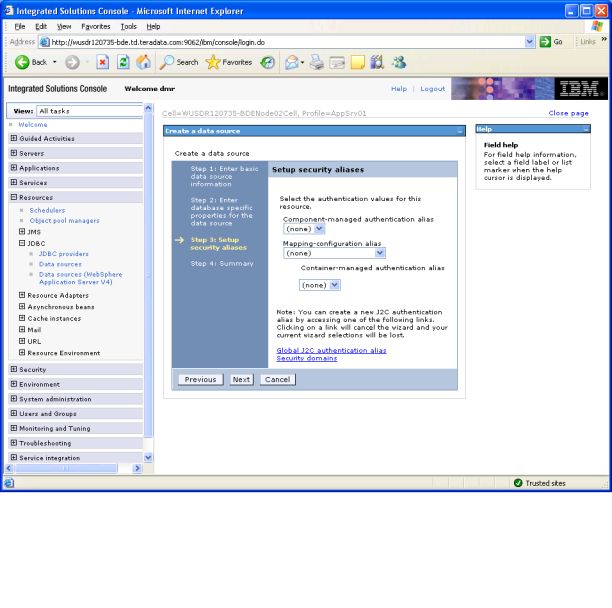
Accept the defaults of "none".
The required configuration information is listed in the following table.
Field | Value |
Component Managed Authentication alias | None |
Mapping-configuaration | None |
Component Managed Authentication alias | None |
The following screen shot illustrates the fourth step: Summary
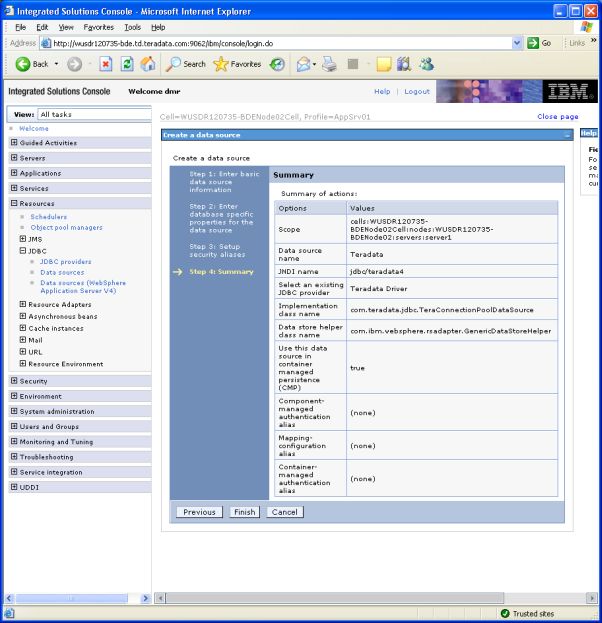
Press "Finish" to submit the changes.
The following screen shot shows the newly created data source information.
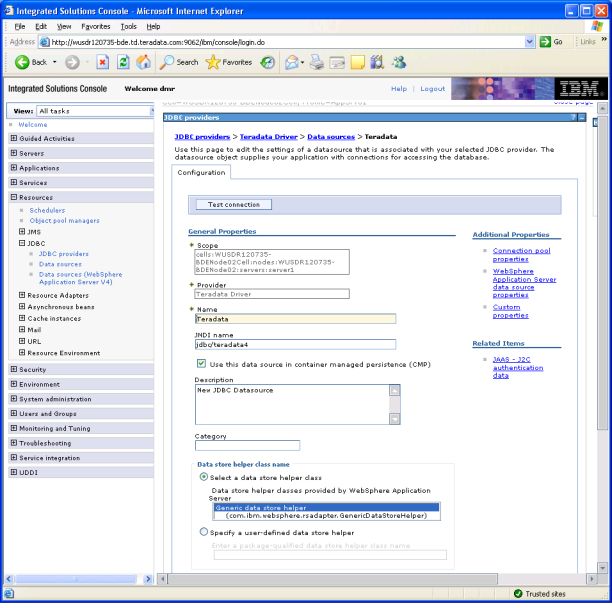
Now, under "Additional Properties" in the right pane, click "Custom properties".
Set Data Source Custom Properties
In the "Custom properties" pane, WebSphere 7.0 lists all possible custom properties based on the Teradata JDBC Driver jar file(s) in the class path. You can insert the values for the properties you are trying to define, or you can create a custom property by clicking "New" button.
The following figures show how to set the custom properties of the Data Source such as user name, password and data source name.
Set custom property "user":

Set custom property "DSName":

Set custom property "password":

The required custom property information is listed in the following table.
Name | Description | Value |
DSName | The hostname of the database. | xpsys03 |
user | The database username. | guest |
password | The password. | please |
Note: The "Database name", "Default User Id" and "Default User password" of a version 4.x data source will override any values defined as custom properties
In addition to the above parameters, all of the parameters that can be specified in a Teradata JDBC connection URL can also be specified here.
Click "Save" to save your changes. The connection can be tested by selecting the data source and clicking "Test Connection" as shown in the figure below. Please note that the values shown above specify a specific account on a specific database. You will need to modify the value portion of these properties to match the database you are accessing.
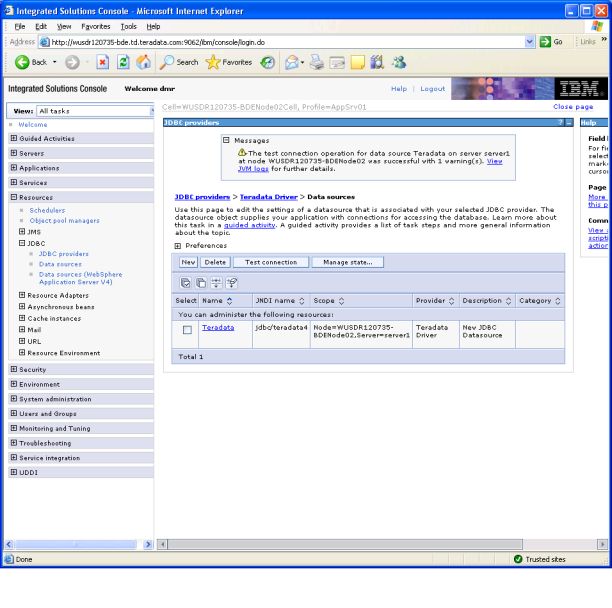
You should see a message similar to "The test connection operation for data source Teradata on server server1 at node WUSJY185005-ZBRNode01 was successful with 1 warning(s). View JVM logs for further details.".
The warning message corresponds to a log entry generated by WebSphere: "DSRA0174W: Warning: GenericDataStoreHelper is being used" and does not indicate any actual problems with the datasource.
Accessing the DataSource via a Java Servlet
A Java servlet can access a data source to get pooled connections.
DataSource.getConnection() vs. DataSource.getConnection(username,password)
With WebSphere, a JDBC Provider is defined to specify information about the JDBC driver. After the JDBC Provider has been defined, then one or more Data Sources can be configured for the JDBC Provider. After each Data Source has been defined, Custom Properties can be configured for each Data Source.
The Data Source's "user" and "password" Custom Properties are optional.
- If "user" and "password" Custom Properties are defined, then they serve as the default values when an application calls DataSource.getConnection().
- If "user" and "password" Custom Properties are defined, then the application can override those default values by calling DataSource.getConnection(username,password).
- If "user" and "password" Custom Properties are not defined, then an application must call DataSource.getConnection(username,password) in order to connect to the database.
In other words, user and password values must be specified either as Custom Properties, or as arguments to DataSource.getConnection(username,password), or both; and when both are specified, then the arguments to DataSource.getConnection(username,password) override the "user" and "password" Custom Properties defined for a Data Source.
A SQLException will be thrown if user and password values are not specified in either Custom Properties, or as arguments to DataSource.getConnection(username,password).
The exception will differ depending on the combination of Teradata JDBC Driver version and database release.
- Message:
[Teradata JDBC Driver] : Single Sign-On NOT supported for Mechanism TD2. - SQLState:
HY000 - Error code:
1032
- Message:
[Teradata Database] : User identification is not authorized. - SQLState:
08004 - Error code:
3004
A SQLException will be thrown if user and password values are specified, but the specified user or password are invalid. Note that invalid user and password values specified as arguments to DataSource.getConnection(username,password) will override correct user and password values specified in Custom Properties. When DataSource.getConnection(username,password) is called but authentication fails, WebSphere does not "fallback" to use the values specified in Custom Properties.
The exception will differ depending on the combination of Teradata JDBC Driver version and database release.
- Message:
[Teradata Database] : Invalid password. - SQLState:
28000 - Error code:
3003
- Message:
[Teradata Database] : User identification is not authorized. - SQLState:
08004 - Error code:
3004
Using the DataSource
The servlet is accessed via a URL similar to the following:
http://server/servlet/servletname In the example, the username, password and datasource name are all specified in the URL parameters:
http://charlie/servlet/SampleJdbcServlet?user=guest&password=please&datasource=jdbc/teradata4 Note that user-defined variables are in italics.
Accessing the URL Parameters
        String user = req.getParameter("user");
        String password = req.getParameter("password");
        String datasource = req.getParameter("datasource");
Creating the Initial Naming Context
Context ctx = new InitialContext(); Lookup the Data Source
DataSource ds = (DataSource) ctx.lookup("jdbc/" + datasource); Use the Data Source to get Connections
Connection con = ds.getConnection(user, password); At this point, the connection obtained behaves the same way as one obtained from the Driver Manager.
Complete sample servlets are listed here.
Accessing the DataSource with WebSphere Java 2 Security Enforced
Additional configuration is required when WebSphere Java 2 security is enforced.
How to use the Teradata JDBC Driver with WebSphere Java2 Security
Performance Parameters
After a DataSource has been selected and its properties have been displayed, select "Connection Pool" in the "Additional Properties" panel. This will display the values for properties such as "Connection Timeout", "Maximum Connections" etc.
Maximum Connections - too small of a value here can cause users of the pool to waste time waiting for someone to release a connection.
On the page where these values are set, the help text, which can be displayed by moving the mouse pointer over the property name, will provide detailed information on the settings and information on how these settings can impact performance.
How To Create Datasource In Websphere
Source: https://teradata-docs.s3.amazonaws.com/doc/connectivity/jdbc/reference/current/WebSphere70.html
Posted by: murphyconst1993.blogspot.com

0 Response to "How To Create Datasource In Websphere"
Post a Comment