

How To Create A Mod For Minecraft 1.7 10
A Beginner's Guide to Modding Minecraft (With Java)
![]()
A quick note before we begin: as of June 2020 this guide is now over 2 years old, some changes over t hese last two years (including changes to Gradle) seem to have thrown some additional problems for users into the mix. Minecraft Forge for 1.7.10 itself has not been updated since 2015. I am leaving this guide online as a reference for 1.7.10's modding community, but I cannot guarantee that things today are working the same as they did at the time of writing. You may find new errors that I am unfamiliar with and I am unable to offer much support as I haven't been working with 1.7.10 in over a year now. If you do come across an error and have a solution for it please comment below or contact me directly and I can update the article.
In this post I'll be explaining how to get started modding Minecraft. For the sake of this tutorial I'll be working with Minecraft 1.7.10 (which I'm rather familiar with modding for). Ahead, we'll get the tools needed to mod Minecraft, setup a mod project, and create our own custom block: "Amethyst Ore" from which we'll be able to mine Amethyst and we'll mod this block such that it generates randomly throughout the map. I'll recommend that you meet the following prerequisites to get the most out of this guide:
- A cursory knowledge of object-oriented Java programming would be incredibly useful but isn't necessarily required. We'll be writing more than a few dozen lines of Java code across a handful of classes though so if you have an idea of how to code it will make things easier.
- An understanding of how to use Minecraft Forge. As a requirement, you'll need to understand how to install Minecraft Forge and how to install mods for it, otherwise, how would you test your mod?
Want to read this story later? Save it in Journal.
Thankfully, both object-oriented Java programming and Minecraft Forge usage already have countless tutorials available online, so if you'd like to try following along with this guide and refer to Google for other such tutorials if you need some supporting information.
Let's have a quick overview first. I've broken this guide down into five steps, although the steps are not equal: they vary in difficulty, and they grow in size until we reach step 5, which is where we'll really get into the "modding" part and so it's the biggest step by far. The steps are:
- [Step 1] Getting Your Tools: Java & Eclipse
- [Step 2] Getting Your Tools: Forge
- [Step 3] Setting up Your Eclipse Project
- [Step 4] Decompiling Minecraft
- [Step 5] Modifying Minecraft
[Step 1] Getting Your Tools: Java & Eclipse
First things first — you're going to need the Java Development Kit (JDK). You can find it on Oracle's website here. As Oracle puts it on their website: "The JDK is a development environment for building applications, applets, and components using the Java programming language." To explain a bit on that, you might think of your Minecraft mod as a "component" in that context.
In any case, once you've installed the Java Development Kit, next you'll need the Eclipse IDE. An "IDE" is an Integrated Development Environment, and at a first glance you might think IDE's are fancy text editors for writing code in, although they have a lot of features to help us with our programming beyond that.
In any case, the Eclipse IDE is our go-to tool and is perhaps the most popular IDE for writing Java. Download the Eclipse installer here, and when you start it up, you should get prompted with a window similar to this:

You'll want to select the first choice: "Eclipse IDE for Java Developers". For those of you who are all-new to this: Minecraft's code is written in the Java programming language so as a result this is the programming language we'll be working with to create mods for it. The Eclipse installer is quite straightforward, you can just follow along accepting the standard options and select "Launch" once it has completed. Finally, when the installation is over and the Eclipse Launcher starts up it will prompt you to select a directory for your workspace, I'm naming mine "MinecraftWorkspace" as you can see here:

Feel free to check the "Use this as the default and do not ask again" box if you'll only be using Eclipse for your Minecraft modding, as you'll be able to manage multiple projects in this workspace. Otherwise, click that Launch button at the bottom and we're ready to move on to the next step.
[Step 2] Getting Your Tools: Forge
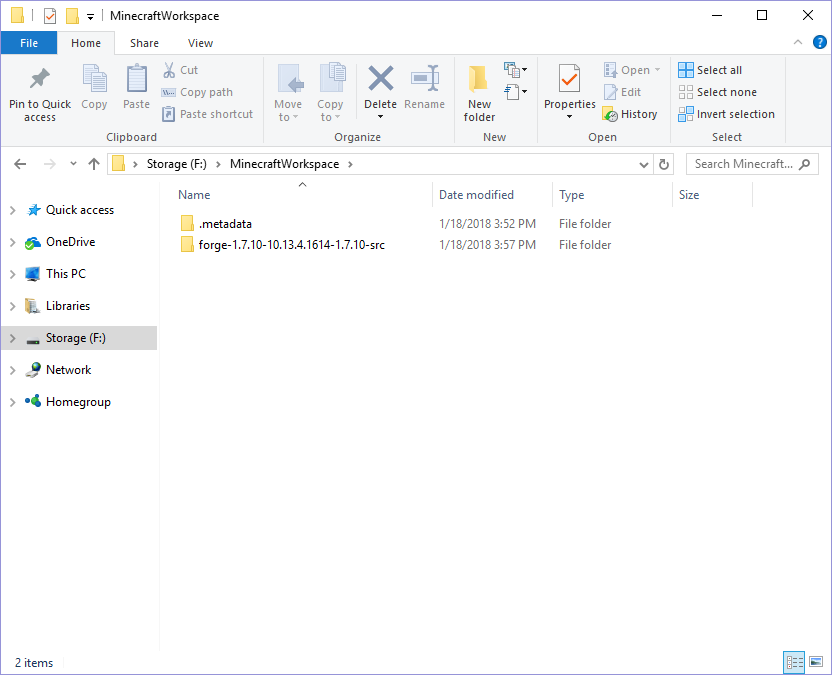
Now we'll need to get Minecraft Forge, in particular we'll want the 1.7.10 Minecraft Forge as we'll be modding Minecraft 1.7.10. It's important that the versions match up, trust me. Head here to get the most recent version of Minecraft Forge for 1.7.10.

This is the Minecraft Forge website, you'll notice there are several downloads available. This time around, ignore the "Windows Installer" and download the "Src". It will be a .zip file, extract this and drag the resulting folder into your MinecraftWorkspace directory that we created with Eclipse in the previous step. Your MinecraftWorkspace directory should now look something like this:
[Step 3] Setting up Your Eclipse Project
Back in Eclipse, assuming you've left it running, you should find yourself at the 'Welcome' screen. From here, simply click File -> Open Projects from File System… and then navigate to your Minecraft Forge directory which you've just placed in your MinecraftWorkspace directory in the previous step. For example, here is mine:
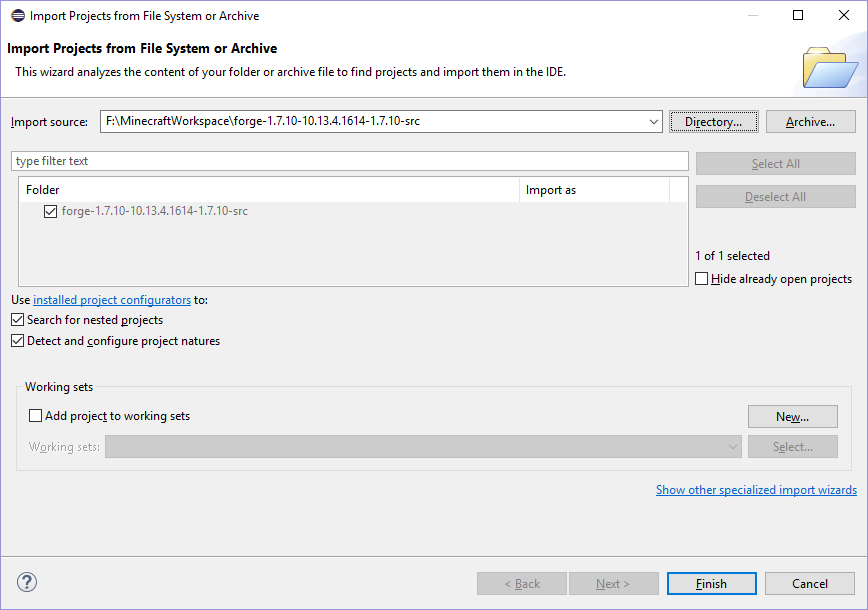
Once you've selected your Forge directory, click the Finish button. At this point you should see something like this:

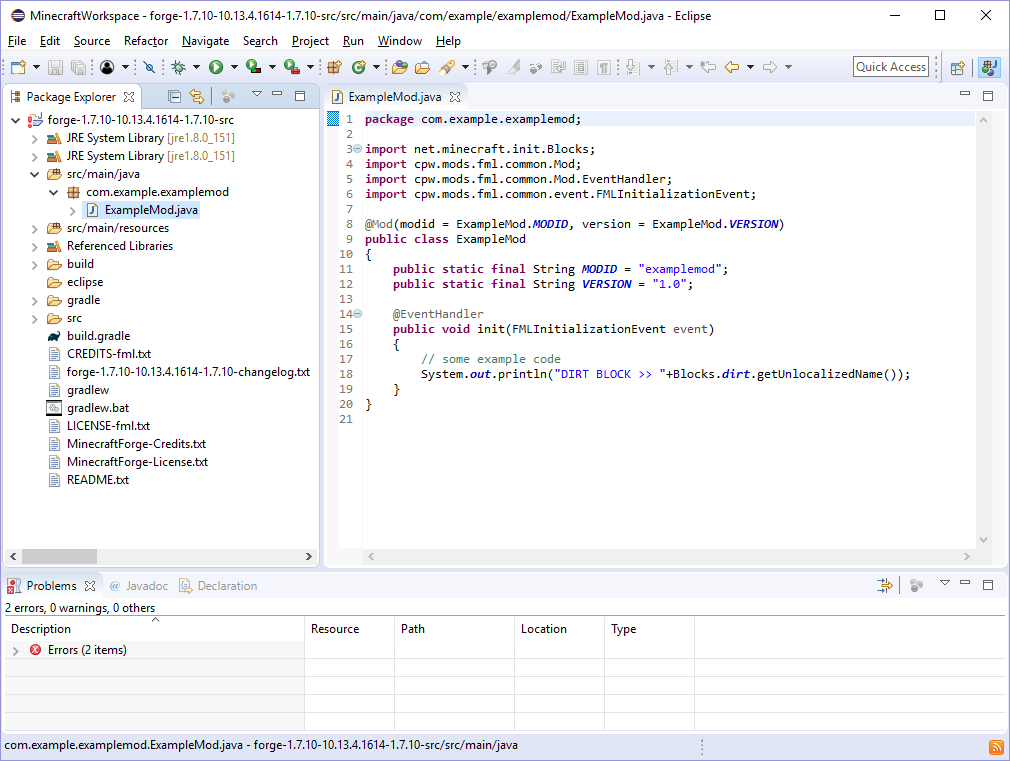
If, for whatever reason, this view doesn't appear for you automatically, just navigate to Window -> Show View -> Package Explorer. In any case, you should be seeing that we have an ExampleMod.java file — an example mod for Minecraft, however you should be seeing that it has a number of errors. Let's fix these.
[EDIT (December 2020)]: Before proceeding to Step 4 you will need to make some quick fixes to your build.gradle file due to changes that require Gradle to now use HTTPS instead of HTTP. See this Git-Hub Gist for an example build.gradle file with the fixes you'll need to get going. (Take notice of the comments in that example file on lines 1, 6, and 25).
[Step 4] Decompiling Minecraft
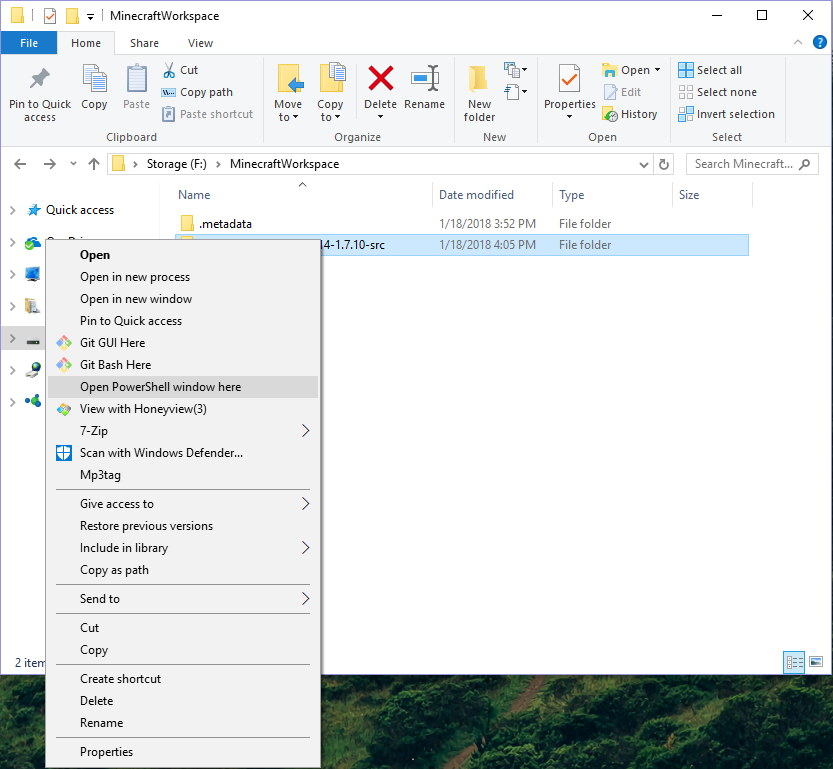
Let's open up our MinecraftWorkspace directory and do a Shift+Right Click on our Forge folder, selecting the "Open PowerShell window here" option to start up PowerShell.
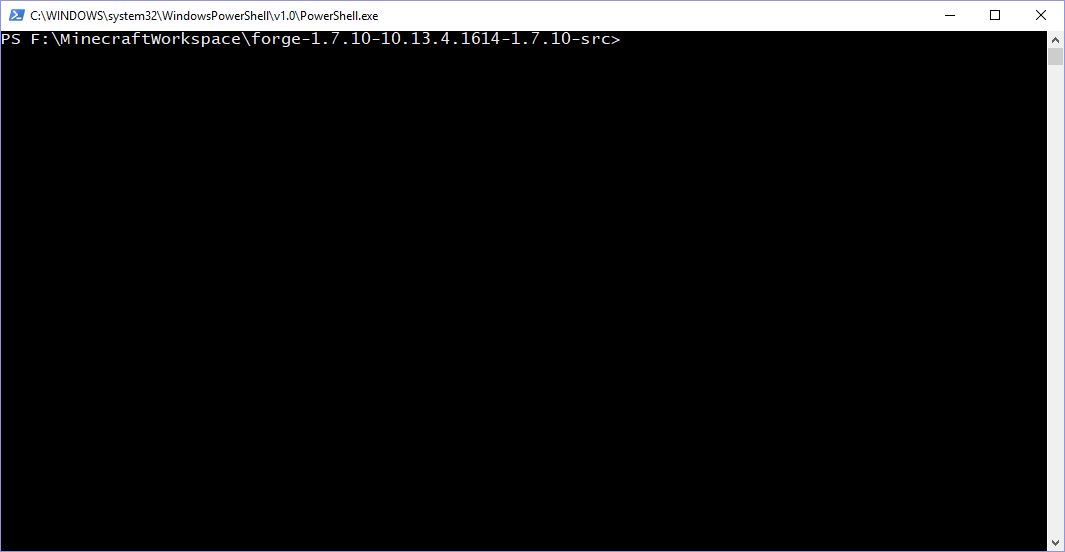
You should see the following (take note that you should be located directly inside the 'forge-1.7.10-…' directory):
Here we'll enter:
.\gradlew tasks
This will show us all the available tasks we can run, there are quite a few, but we're most interested in running "setupDecompWorkspace" so let's go ahead and do that by entering:
.\gradlew setupDecompWorkspace
This command will run for a fair amount of time, as it needs to decompile Minecraft for us. Thankfully, we'll only need to do this once. You'll know it's done because it will say "BUILD SUCCESSFUL" if everything goes according to plan. This will setup our environment such that we are ready to modify Minecraft. Next we'll need to run a final command:
.\gradlew eclipse
This command will set up an Eclipse project (which we'll be working in) for us. This command will run a fair bit quicker, and when it's done you should notice that the errors have vanished from our Eclipse project. Handy!
[EDIT (September 2019)]: You may find you are still having import errors at this point. This seems to happen for some readers but not others. I haven't exactly figured out why, but it seems that removing your project from Eclipse and re-importing it may resolve the problem in some cases.
[Step 5] Modifying Minecraft
If you haven't had too much trouble following along with the setup phase of this tutorial, congratulations, we're now ready to start modding Minecraft. You'll notice that this Step 5 is quite lengthy. I wanted to comprehensively display how to add and customize a new block for you, don't worry if it seems intimidating we'll go through it step by step. For now, we'll get started by making a custom block — don't worry I'll supply some textures so you don't need to be a pixel artist just yet. In any case, you should now go ahead and open up your ExampleMod.java file by navigating to it in the Package Explorer pane.
You'll notice that this code really isn't doing much. That's okay, we'll add some of our own code to spruce things up a bit. Let's start by removing that System.out.println() and creating a skeleton for a new private class. The code inside our ExampleMod class should now look like this (throughout this tutorial I'll be bolding code that I've added in that step, so pay careful attention to the bolding!):
public static final String MODID = "examplemod";
public static final String VERSION = "1.0"; @EventHandler
public void init(FMLInitializationEvent event)
{}
private class ModBlock extends Block
{}
Now you can probably guess where this is going —the Block class is a vanilla Minecraft block. By extending it with our ModBlock class we can create our own block, featuring properties of our design. Let's start fleshing out this class by adding a constructor:
          private class ModBlock extends Block
            {
                          public ModBlock(Material material, String blockName)
              {
              super(material);
              this.setBlockName(blockName);
              this.setBlockTextureName(MODID + ":" + blockName);
              }
            }
This constructor should be pretty straightforward. We pass in a Material and a name for our block. There are a number of materials we can choose from that will give our block certain properties, such as rock, cloth or wood, but for now we won't worry about that. Let's talk instead about .setBlockName() and .setBlockTextureName(). .setBlockName() is how we determine what our block will be identified as by the game, and .setBlockTextureName() identifies what the name of the texture our block will be using is. It's very important that our block's texture name follows the convention of "[Mod ID]:[Block Name]". Finally lets add one more line of code to our constructor so that our block is available to us in Creative Mode, our constructor becomes:
          private class ModBlock extends Block
            {
            public ModBlock(Material material, String blockName)
            {
            super(material);
            this.setBlockName(blockName);
            this.setBlockTextureName(MODID + ":" + blockName);
            this.setCreativeTab(CreativeTabs.tabBlock);
            }
            }
The above change tells the game which "tab" our block should show up under in the Creative Mode menu. With this, our ModBlock class is ready to be used. Let's make our final additions to the code.
          @Mod(modid = ExampleMod.MODID, version = ExampleMod.VERSION)
public class ExampleMod
{
            public static final String MODID = "examplemod";
            public static final String VERSION = "1.0";                  @EventHandler
              public void init(FMLInitializationEvent event)
              {
                              Block amethystOre = new ModBlock(Material.rock, "amethystOre");
                GameRegistry.registerBlock(amethystOre, "amethystOre");
              }                              private class ModBlock extends Block
              {
              public ModBlock(Material material, String blockName)
              {
              super(material);
              this.setBlockName(blockName);
              this.setBlockTextureName(MODID + ":" + blockName);
              this.setCreativeTab(CreativeTabs.tabBlock);
              }
              }                          }
Here we are using our "init" function to initialize a new ModBlock named "amethystOre" and then using the GameRegistry to register the block. Registering the block is a critical step, as an unregistered block will not be present in the game. With this, we can build our mod, let's return to PowerShell, and run
.\gradlew build
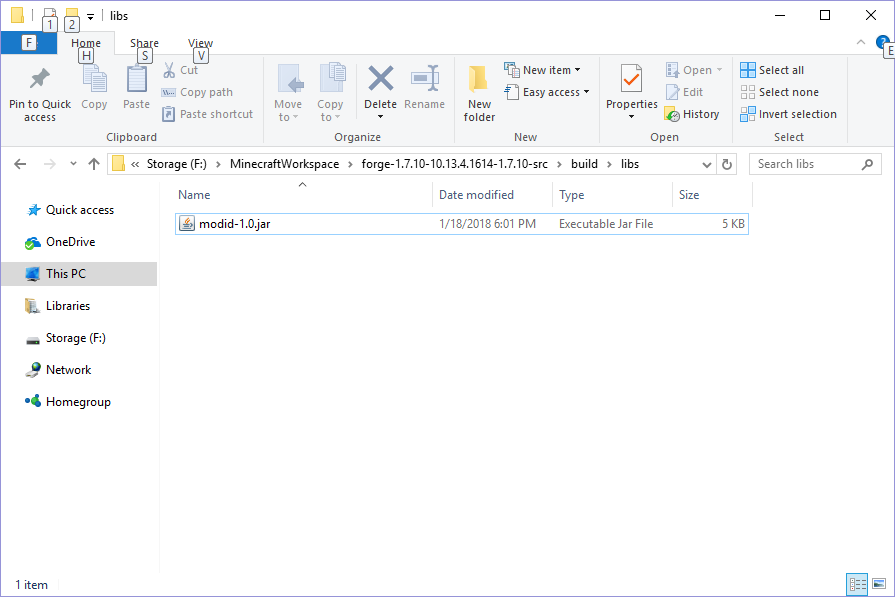
Once again, once the build command has finished we'll get a positive "BUILD SUCCESSFUL" message. You should find, within your forge directory, that your mod has been built to the build/libs/ subdirectory as "modid-1.0":
Hopefully you're familiar with installing a Forge mod, if you aren't there are plenty of tutorials elsewhere online that can help you out.

Once you have installed your mod and started up Minecraft,you should be able to locate a strange looking pink and black block named "tile.amethystOre.name". It's pink and black because we haven't given it a texture to display, and its name is a bit off because we haven't specified the plain English name yet. Let's go ahead and do these things because they'll be quite easy to do and will make our block look much better.
First of all, here is the image I will use for our amethyst ore:

Go ahead and save that (making sure to name it amethystOre.png) we'll want to add it to our Eclipse project in a specific directory so that the game is able to locate it. The directory we want to place our block textures in is "src\main\resources\assets\examplemod\textures\blocks". Make sure this is added properly to your eclipse project, it should look just as it does in my Package Explorer pane here:

Next we'll want to create our language file (this is where we'll specify that we'd like our block to be called "Amethyst Ore" instead of "tile.amethystOre.name"). This file will named "en_US.lang" (it must be named this to be recognized by the game) and it will be placed in the "src\main\resources\assets\examplemod\lang\" directory, just like this:
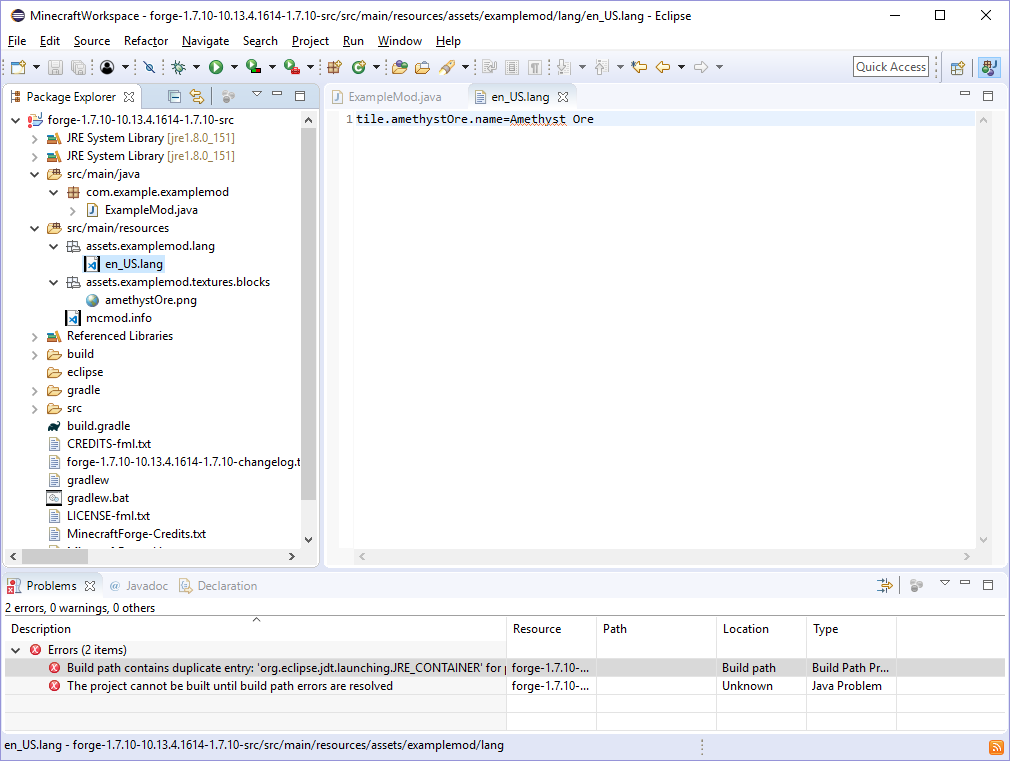
Inside our en_US.lang file, as you can see above, we need to enter this line, in order to map the "plain English" name to the game's identifier:
tile.amethystOre.name=Amethyst Ore
Make sure you save your en_US.lang file and then head back to PowerShell to run another build! With that you should find our Amethyst Ore block is quite functional!

Congratulations are due, as at this point, you've created a simple mod for Minecraft! You may, however, have noticed that this block breaks quite easily, and doesn't drop an ore as do other ore blocks in Minecraft like Iron or Gold. So let's keep working on it by first returning to our ModBlock subclass:
          private class ModBlock extends Block
            {
            public ModBlock(Material material, String blockName)
            {
            super(material);
            this.setBlockName(blockName);
            this.setBlockTextureName(MODID + ":" + blockName);
            this.setCreativeTab(CreativeTabs.tabBlock);
            this.setHardness(4.0F);
              this.setHarvestLevel("pickaxe", 1);
            }
            }
The above lines I'm adding (.setHardness() and .setHarvestLevel()) are incredibly important to customizing your block.
- .setHardness() determines how long it will take you to break the block, as you can see it accepts a float value. For comparison, Iron Ore has a hardness of 3.0F, while Obsidian has a hardness of 50.0F.
- .setHarvestLevel() determines what tool you can use to break this block. It accepts two parameters, a hardcoded string such as "axe" or "shovel" that determines the usable tool type and an integer representing the "level" of
                      * @param level Harvest level:
            *     Wood:    0
            *     Stone:   1
            *     Iron:    2
            *     Diamond: 3
            *     Gold:    0
            */
* @param level Harvest level:
* Wood: 0
* Stone: 1
* Iron: 2
* Diamond: 3
* Gold: 0
*/ So knowing that, you can see that I'm programming our Amethyst Ore to be a bit tougher to break than Iron, and to require a Pickaxe that is made of Stone or a tougher material in order to properly harvest the block — that isn't to say a wooden pickaxe couldn't break it, just that you wouldn't receive the block's drops when you use a wooden pickaxe, much like Iron Ore.
If you'd like, feel free to pause here, build your mod and test out these changes. When you're ready, let's make our block drop Amethysts instead of dropping the Amethyst Ore block itself.
Once again, here is the image I'll be using for the amethyst itself, go ahead and save it:

Because this is an item and not a block we need to save it to a slightly different directory: "src\main\resources\assets\examplemod\textures\items" to confirm what this looks like inside Eclipse, here's a screenshot of my Package Explorer at this point in developing our mod:

Now we'll need to code our Amethyst item. This code looks very similar to our code for adding a block, essentially we'll create a ModItem class that extends the Minecraft Item class and we'll set our own properties. We'll then use the GameRegistry once again to register our item. So back in ExampleMod.java, let's create our ModItem class:
                      private class ModItem extends Item
            {
            public ModItem(String itemName)
            {
            this.setUnlocalizedName(itemName);
            this.setTextureName(MODID + ":" + itemName);
            this.setCreativeTab(CreativeTabs.tabMisc);
            }              }
Looks pretty similar to our ModBlock class doesn't it? This time we're not passing in a material, only the name of our item however. Once again, we set the item's name so that the game knows how to identify it, we set the texture name so the game knows where to find the texture for our item, and we set which Creative Mode tab the item should be located in. Now we just need to edit our init() call to initialize the Amethyst item:
          @EventHandler
            public void init(FMLInitializationEvent event)
            {
            Item amethyst = new ModItem("amethyst");
              GameRegistry.registerItem(amethyst, "amethyst");                                Block amethystOre = new ModBlock(Material.rock, "amethystOre");
            GameRegistry.registerBlock(amethystOre, "amethystOre");
            }
Take note that, just like with our ModBlock, we're instantiating our ModItem and then registering it using the GameRegistry. Let's go ahead and add the "plain english" name for our item to our en_US.lang file so that the game displays "Amethyst" instead of item.amethyst.name! Our en_US.lang file should now look like this:
tile.amethystOre.name=Amethyst Ore
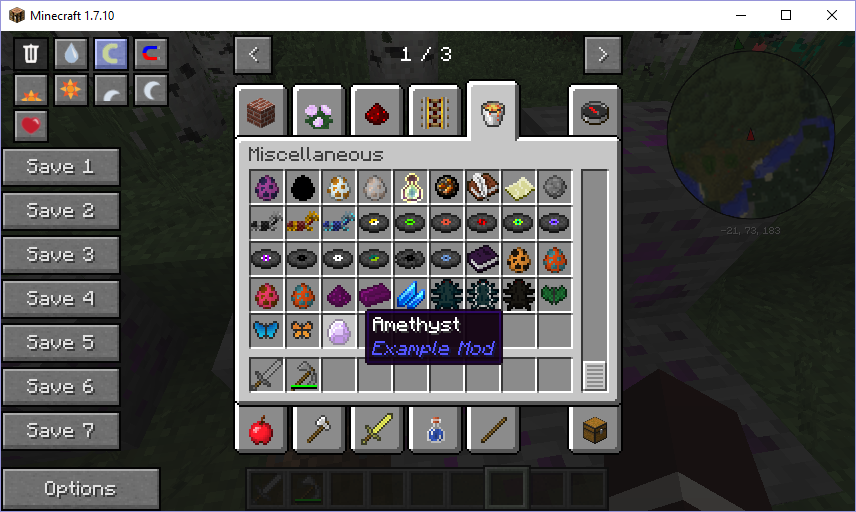
item.amethyst.name=Amethyst And with that we've added a new item to the game! Feel free to run a build and test out the mod again to find our new item in the "Miscellaneous" tab in Creative Mode:
Now, as you've probably guessed, we would like our Amethyst Ore block to drop our Amethyst item when we break it with a pickaxe! Let's go ahead and code that as it's a rather accessible change to make. First we'll want to edit our ModBlock class to override the Item class' .getItemDropped() method, this will look like this:
                      private class ModBlock extends Block
            {
            private Item toDrop;                                  public ModBlock(Material material, String blockName)
              {
              super(material);
              this.setBlockName(blockName);
              this.setBlockTextureName(MODID + ":" + blockName);
              this.setCreativeTab(CreativeTabs.tabBlock);
              this.setHardness(4.0F);
              this.setHarvestLevel("pickaxe", 1);
              }                                        @Override
                public Item getItemDropped(int i, Random random, int j)
                {
                if(toDrop != null)
                {
                return toDrop;
                }
                else return Item.getItemFromBlock(this);
                }                                          }
Okay, so that's a considerable change we're making. We're giving our class the property of an Item named "toDrop", this will represent which item our ModBlock will drop. Our overridden method, .getItemDropped() is being overridden to accomplish the change of dropping our "toDrop" item instead of the usual block. Of course, if we don't set a "toDrop" item it will default to the block-dropping behaviour. Now we'll want to change our constructor so that we can pass in which item we want to drop. Our new constructor will look like this:
          public ModBlock(Material material, String blockName, Item toDrop)
            {
            super(material);
            this.setBlockName(blockName);
            this.setBlockTextureName(MODID + ":" + blockName);
            this.setCreativeTab(CreativeTabs.tabBlock);
            this.setHardness(4.0F);
            this.setHarvestLevel("pickaxe", 1);
            this.toDrop = toDrop;
            }
Once we make this change, we'll of course have to change how we're instantiating this class in our .init() call:
          @EventHandler
            public void init(FMLInitializationEvent event)
            {
            Item amethyst = new ModItem("amethyst");
            GameRegistry.registerItem(amethyst, "amethyst");                            Block amethystOre = new ModBlock(Material.rock, "amethystOre", amethyst);
              GameRegistry.registerBlock(amethystOre, "amethystOre");
              }
And with that final change, you should find that your Amethyst Ore is now dropping Amethysts when harvested using a pickaxe that is made of Stone (or a stronger material):
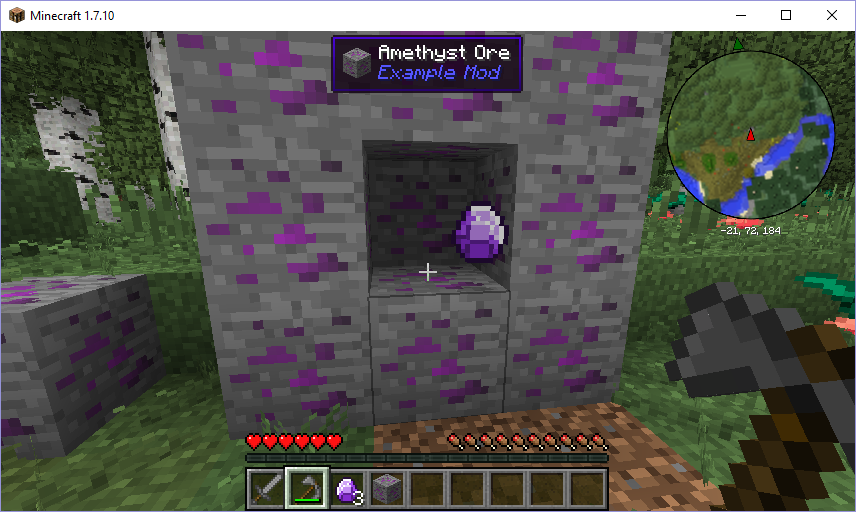
Let's take a moment to review, because at this point we've not only just gotten our modding tools and environment setup, but we've also used them and added a new block and a new item to the game, and we've done so in about 70 new lines of Java code, two new textures, and a little bit of editing to our .lang file. Obviously there's lots of routes we can take this in that you're probably wondering about, for example:
- How can I make my Amethyst Ore block generate randomly throughout the map?
We'll get there — don't worry, this is after all, intended to be a very comprehensive guide. However, I'd like to point out that this is the first part of the tutorial you've completed. In the next part we'll restructure our project and then delve deeper into some of the modifications we can make with our block— but you should feel more than free to take a break here.
Welcome to the second part of the guide. I'd like to do some refactoring as our code, in its current state, is a bit messy. I'd like to rename our mod, and move our ModBlock and ModItem classes out into their own .java files for organization purposes.
I'm going to name my mod "aubreymoddemo" but feel free to name your mod whatever you please. Renaming our mod is actually going to be a rather complicated process as there are a number of places we will want to take into consideration:
- Our Eclipse project name
- Our main package, currently named com.example.examplemod
- Our main Java file, currently named ExampleMod.java
- Our MODID property within that ExampleMod class.
- Our textures location, currently named assets.examplemod.textures
- Our lang files location, currently named assets.examplemod.lang
- Our mcmod.info file (which we have yet to look at)
- Our build.gradle file (which we have also yet to look at)
So long as we are consistent with our naming convention however we should have no trouble. Let's tackle this renaming process in the same order above.
- First things first let's right-click our "forge-1.7.10-…" project in the Package Explorer, and select Refactor -> Rename and rename our project.
- Now, let's right-click our com.example.examplemod package, and again select Refactor -> Rename and rename it.
- Next I'm going to Refactor -> Rename our ExampleMod.java and name it "Main.java" as it is the main component of our mod.
- Now let's Refactor -> Rename our assets.examplemod.textures and assets.examplemod.lang package that our resources are in.
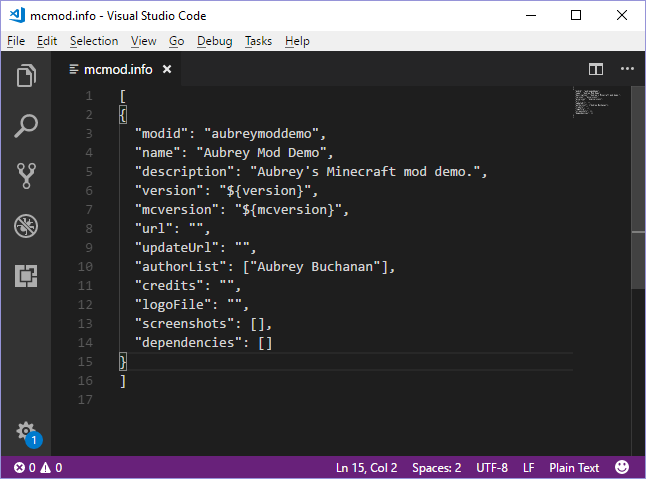
- Next, let's open up our mcmod.info file (it should have been created for you and should be visible inside 'src/main/resources' in the Package Explorer). You should see a number of fields you will want to edit, such as "modid", "name", "description" and "authorList". Here's how I've edited mine:
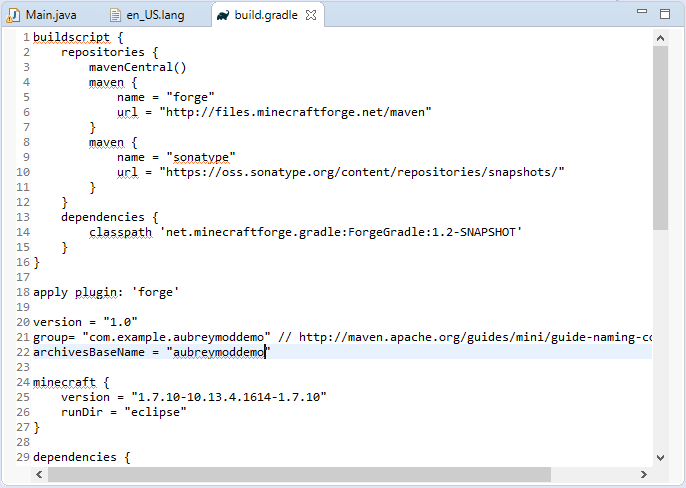
- Finally, let's open up our build.gradle file (you should also be able to locate this in the Package Explorer). We'll want to make changes to the lines around line 20 where the values are set for "group" and "archivesBaseName". Once again, here's how I've edited mine (note the only changes I made were on lines 21 and 22):
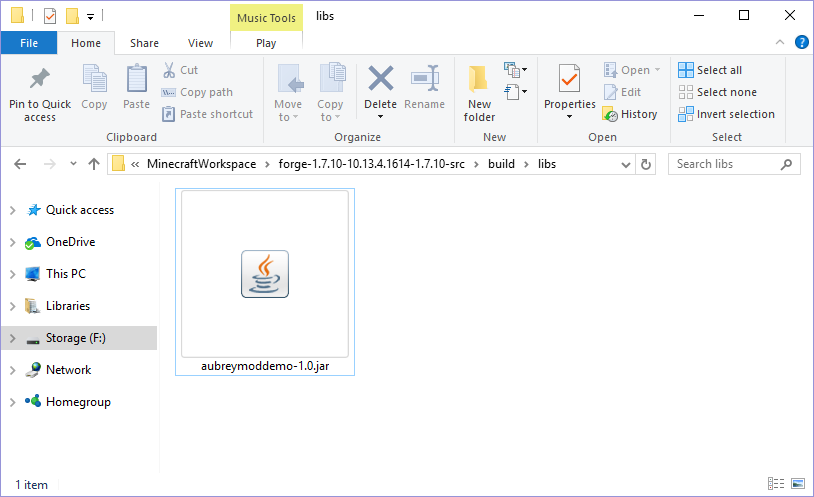
Make sure you save everything and then run a build. You should notice that when your mod is built now, it's actually named with your modid! That's a result of the change we made to our build.gradle.
It's important for us to build and test our mod at this point as it's all too easy to slip up and misname something. If you find you have missing (pink and black textures) or your "plain English" names aren't being displayed, go back and double check the list above to ensure you've named everything identically. In case it may help you, here's a glance at my Package Explorer after making these changes:

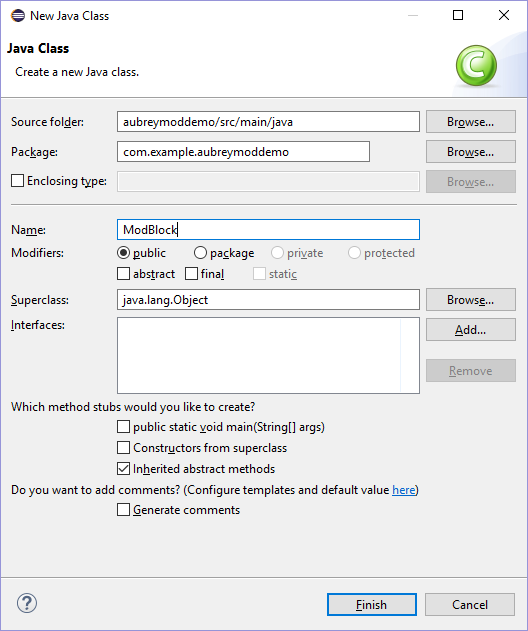
Next, we're going to separate the code in our Main.java into distinct classes. Right-click the "com.example.aubreymoddemo" package (or whatever you may have named it) and select New -> Class. We'll do this twice, naming one "ModBlock" and the other "ModItem". No need to worry about all the options here, you can just select 'Finish' after entering the name of the class.
We'll now cut and paste the code from our classes, currently in Main.java, into their new homes in ModBlock.java and ModItem.java. For each class there will be some minor changes, so look carefully:
                      public            class ModBlock extends Block
{
            private Item toDrop;                  public ModBlock(Material material, String blockName, Item toDrop)
              {
              super(material);
              this.setBlockName(blockName);
              this.setBlockTextureName(Main.MODID              + ":" + blockName);
              this.setCreativeTab(CreativeTabs.tabBlock);
              this.setHardness(4.0F);
              this.setHarvestLevel("pickaxe", 1);
              this.toDrop = toDrop;
              }                              @Override
              public Item getItemDropped(int i, Random random, int j)
              {
              if(toDrop != null)
              {
              return toDrop;
              }
              else return Item.getItemFromBlock(this);
              }
}
Take note that our class is now declared as "public" in that first line above. Also note that our MODID value is actually stored in Main.java, so we'll need to refer to it by adding a prefix, changing it to Main.MODID. These same changes will apply to your ModItem class as well.
Once again, after making these changes let's ensure we've saved everything and then run a build and test our mod. Frequent testing when you're modding will help narrow down the troubleshooting process should something go wrong, so it's a great habit to build while you're ahead.
In any case, with those changes out of the way, we're ready to start digging deeper into our mod. Let's start by making our block, Amethyst Ore start spawning at random throughout the world!
To do this, we'll need implement the IWorldGenerator class, so let's right-click our "com.example.aubreymoddemo" package (or again, whatever you've named your mod) and select New -> Class. Once again, we only need to worry ourselves with the name of the class, and we can call it ModWorldGenerator. Let's open up our new class and implement IWorldGenerator, like this:
          public class ModWorldGenerator implements IWorldGenerator
{
            @Override
            public void generate(Random random, int chunkX, int chunkZ, World world, IChunkProvider chunkGenerator, IChunkProvider chunkProvider)
            {
            // TODO Auto-generated method stub                  }
}
You'll notice that by just adding the keywords "implements IWorldGenerator" you'll be prompted to implement the .generate() method. We'll leave this class in this state for now, as we'll need to make some changes in Main.java in order to access our amethystOre block in our ModWorldGenerator. What we need to do in Main.java is declare our items and blocks so that they are publicly available. This will look something like this:
          @Mod(modid = Main.MODID, version = Main.VERSION)
public class Main
{
            public static final String MODID = "aubreymoddemo";
            public static final String VERSION = "1.0";                              public static Item amethyst;
                public static Block amethystOre;                                          @EventHandler
              public void init(FMLInitializationEvent event)
              {
                amethyst = new ModItem("amethyst");
              GameRegistry.registerItem(amethyst, "amethyst");                                          amethystOre = new ModBlock(Material.rock, "amethystOre", amethyst);
              GameRegistry.registerBlock(amethystOre, "amethystOre");
              }                          }
Note the new public static declarations near the top. Now that our blocks and items are publicly accessible let's head back to MapWorldGenerator.java to get things going. First, we'll want to add a block property and a veinSize property and a constructor that accepts these as parameters. Your class should look something like this:
public class ModWorldGenerator implements IWorldGenerator
{
private Block block;
private int veinSize;ModWorldGenerator(Block block, int veinSize)
@Override
{
this.block = block;
this.veinSize = veinSize;
}
public void generate(Random random, int chunkX, int chunkZ, World world, IChunkProvider chunkGenerator, IChunkProvider chunkProvider)
{
// TODO Auto-generated method stub}
}
Now we can flesh out our .generate() method:
          @Override
            public void generate(Random random, int chunkX, int chunkZ, World world, IChunkProvider chunkGenerator, IChunkProvider chunkProvider)
            {
            if (world.provider.dimensionId == 0) {
            this.runGenerator(new WorldGenMinable(block, veinSize), world, random, chunkX, chunkZ, 20, 0, 64);
            }                  }
Now, you'll notice that we haven't created a .runGenerator() method yet. Our .runGenerator() method will do a bit of work for us to ensure that the veins of amethystOre (or any other block) are truly randomized. I wanted to make special note of this .runGenerator() method as I learned it from this excellent tutorial. At large, this method had just been lifted as it was in that tutorial as it truly is a standard in world generation, and it can be used for all world generation purposes really. In any case here it is:
          private void runGenerator(WorldGenerator generator, World world, Random rand, int chunk_X, int chunk_Z, int chancesToSpawn, int minHeight, int maxHeight)
            {
            if (minHeight < 0 || maxHeight > 256 || minHeight > maxHeight)
            {
            throw new IllegalArgumentException("Illegal Height Arguments for WorldGenerator");
            }                      int heightDiff = maxHeight - minHeight + 1;
              for (int i = 0; i < chancesToSpawn; i ++)
              {
              int x = chunk_X * 16 + rand.nextInt(16);
              int y = minHeight + rand.nextInt(heightDiff);
              int z = chunk_Z * 16 + rand.nextInt(16);
              generator.generate(world, rand, x, y, z);
              }
              }
Last, but not least, we'll need to head back to Main.java and use the GameRegistry to register our new WorldGenerator:
          @EventHandler
            public void init(FMLInitializationEvent event)
            {
            amethyst = new ModItem("amethyst");
            GameRegistry.registerItem(amethyst, "amethyst");                      amethystOre = new ModBlock(Material.rock, "amethystOre", amethyst);
              GameRegistry.registerBlock(amethystOre, "amethystOre");                                          GameRegistry.registerWorldGenerator(new ModWorldGenerator(amethystOre, 6), 0);
              }
Take note that here we are instantiating a new ModWorldGenerator inside the .registerWorldGenerator() call. We pass the values of amethystOre (to specify which block we want to generate in the world) and 6 (to specify the size of the veins to generate of amethystOre). You may notice that .registerWorldGenerator() is actually actually accepting two parameters, our new ModWorldGenerator() AND and integer, in this case "0" — in case you're wondering, according to the JavaDoc this zero represents "a weight to assign to this generator. Heavy weights tend to sink to the bottom of
* list of world generators (i.e. they run later)".
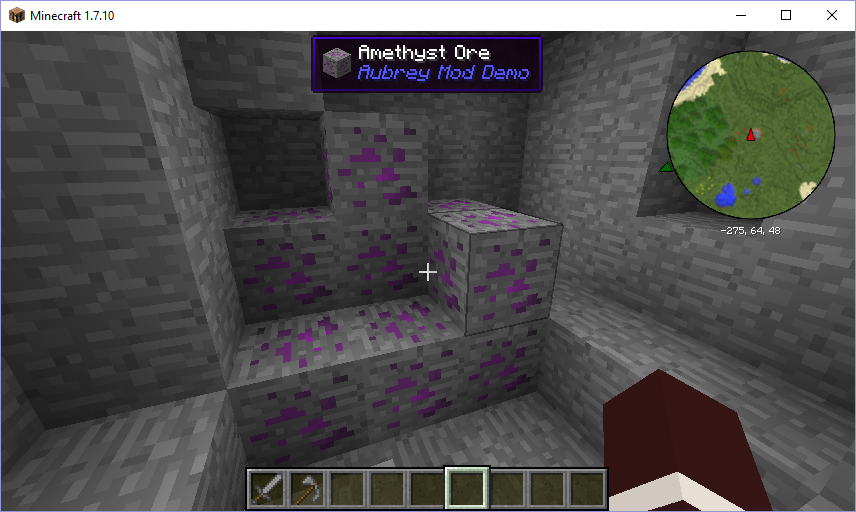
Once again, let's ensure everything is saved and then run a build, install our new build and test our mod. You'll want to create a new world (or explore some uncharted territory in an old one) to activate your newly implemented world generation. It actually didn't take me too long to stumble across some Amethyst Ore in the wild:
Now congratulations are really in order! You've gone from installing Eclipse to implementing world generation in your mod with just a single guide!
How To Create A Mod For Minecraft 1.7 10
Source: https://buchananaubrey.medium.com/a-beginners-guide-to-modding-minecraft-9a42536495f6
Posted by: murphyconst1993.blogspot.com
0 Response to "How To Create A Mod For Minecraft 1.7 10"
Post a Comment